How to Synthesize Risers
Whooshing risers act as punctuation within a track, signifying the end of one section and the beginning of the next. The simplest kind of riser is just a white-noise generator run through an automated filter.
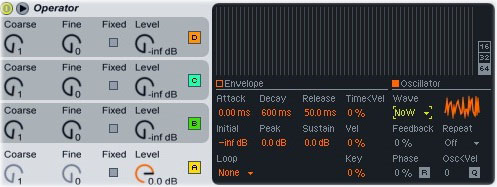
To start making a riser, load up Operator, then create a blank two-bar MIDI clip. Draw a note all the way across the clip. It doesn’t matter which note you use: white noise has no specific frequency. Switch over to Operator’s control panel and set oscillator A’s “Wave” to “Noise White”:
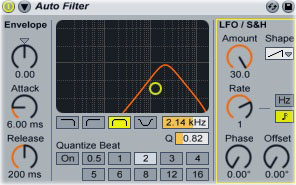
Add an Auto Filter plugin after Operator. Set the filter mode to bandpass, then set the frequency to about 2 kHz. Turn the filter LFO’s “Amount” knob up to 100% and set its “Shape” to an up-ramp. Click the music note icon in the LFO section and turn the “Rate” knob to 2. Turn the “Phase” knob all the way down.
Adding a synthesized waveform to the white noise gives the riser more character. Set Operator to use parallel oscillators (click the vertical line of boxes in the lower-right corner, then click the horizontal row of boxes in the window that opens), then click on oscillator B in the Operator control panel. Set its “Wave” to “Saw 64,” then click the “Fixed” button and set the “Freq” knob to around 150 Hz. Turn up the “Level” knob:
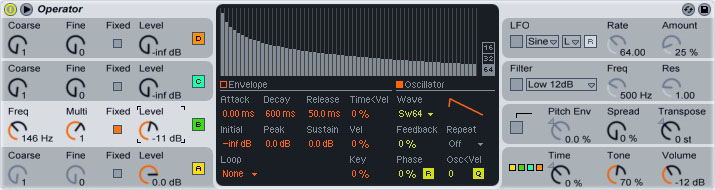
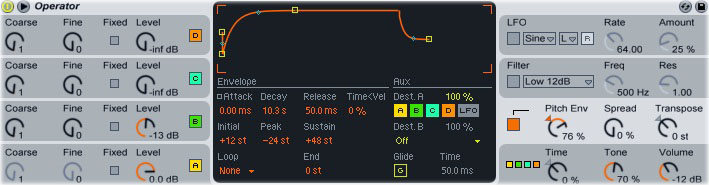
Click the “Pitch Env” box. Turn the “Pitch Env” knob to around 75%, then set the pitch envelope’s decay to about 10 seconds (not milliseconds). Set the envelope’s “Peak” to -24 and its “Sustain” to +48. Play the MIDI clip; you’ll hear a siren-like synth sound being mixed into the riser.
You can make the riser as long as you want: just change the filter LFO’s “Rate” knob to match the new length. For a riser that’s longer than 8 bars, you’ll need to disable the LFO, then draw the filter frequency on an envelope.