Make a Drum & Bass Beat
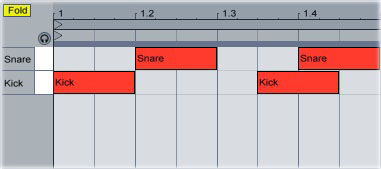
Set Ableton’s tempo to around 175 bpm. Open Drum Rack and load up a kick and snare. Create a new MIDI clip, then put the kick on 1 and 1.3.3. Put a snare on 1.2 and 1.4. This rhythm is the basis of the drum ‘n’ bass beat:
Load up three hi-hat samples: one short closed hi-hat and two longer open hi-hats. Put the closed hi-hat on every 16th note; place the other two in a shuffle pattern between the two kicks, then adjust the volumes and/or velocities of the samples as needed:
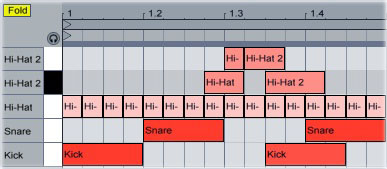
Lengthen the drum loop to 8 bars, then duplicate the pattern that you programmed until it fills the entire 8-bar loop. Move a few of the kicks around to make the beat less repetitive:

Now that we’ve got the basic backbone of the drum ‘n’ bass beat, let’s add a break. You can download a collection of classic Amen breaks from here, or use any of the thousands of breaks available in sample packs. Drop the loop onto an audio track in Ableton, then click the “Warp” button (unless you have auto-warp enabled in the preferences). Add a warp marker at the beginning of every drum hit:

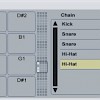
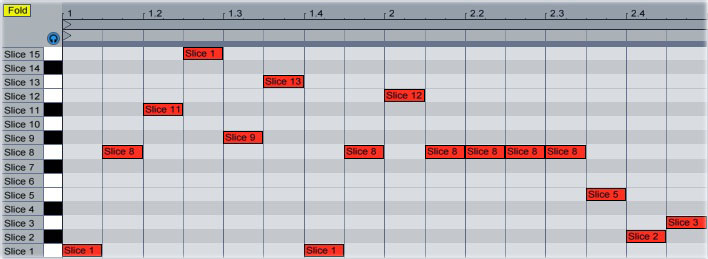
Right-click the clip and select “Slice to New MIDI Track.” Select “Warp Marker” from the “Create one slice per:” menu and “Built-in” as the “Slicing Preset.” Ableton will create a new MIDI track containing a Drum Rack; each slot in the Drum Rack contains a Simpler holding one slice of the drum loop. You can now mute or even delete the original drum loop sample that you loaded.
Create a new, empty MIDI clip in the sliced track, then program in a sequence of MIDI notes. Each MIDI note will trigger a slice of the loop. To make it easier to hear which slice you’re triggering with any given note, click the little headphones icon in the upper-left corner to enable the preview. Whenever you click on a note field, Ableton will play the slice that the field triggers.
Play the sliced track along with the MIDI drum loop that you previously created (you’ll probably need to lower the volume of the sliced track). If it sounds like the lower frequencies in the sliced track are conflicting with the kick drum in the MIDI pattern (as often happens), put a low-pass filter onto the sliced track.
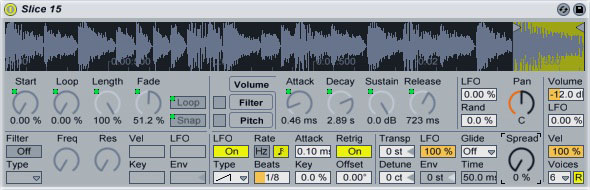
Because each slice within the Drum Rack is actually an instance of Simpler, you can alter any slice independently of the others. Let’s configure the last slice of the loop (slice 15 in this example) so that its pitch rapidly rises every time it’s triggered.
Double-click the slice’s slot to open its Simpler. Turn on the LFO, then set its shape to “ramp up.” Turn on beat synchronization and set “Beats” to “1/8.” Make sure “Retrig” is on, then turn the “LFO” control next to “Transp” all the way up. When you trigger the slice now, its pitch will rapidly “zip” upward: