-
Make a Synth from a Sample
All sounds, synthesized or natural, are made up of waves. Most synthesizers produce simple, pure waveforms, while naturally occurring sounds are much messier — and more interesting.
Read More -
Using the Ableton Chord Plug-in
Ableton’s Chord MIDI effect automatically creates a chord from a single MIDI note. The Chord plug-in is really only useful in conjunction with the Scale plug-in, so start by dropping a Scale effect before the synth.
Read More -
Make a Track from Found Sounds
Prepackaged sample packs are great tools, but unless you alter the samples extensively, they can make your tracks sound cookie-cutter and samey. Recording your own sample packs gives your production a unique sound;
Read More -
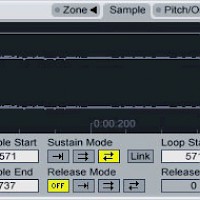
Extreme Sample Stretching
Stretching out audio can do magical things to it: hidden melodies appear, transients crumble into blurs, and tiny blips of sound turn into rich soundscapes.
Read More -
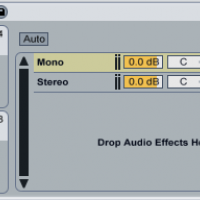
Build a Bass Mono/Stereo Rack in Ableton
Generally speaking, the bass channel in a track should be in mono: most subwoofers (not to mention club soundsystems) play a mono signal much better than a stereo one.
Read More -
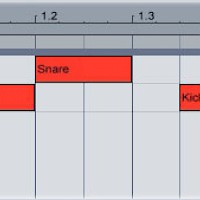
Make a Drum & Bass Beat
Set Ableton’s tempo to around 175 bpm. Open Drum Rack and load up a kick and snare. Create a new MIDI clip, then put the kick on 1 and 1.3.3. Put a snare on 1.2 and 1.4. This rhythm is the basis of the drum ‘n’ bass beat. Load up three hi-hat samples: one short closed hi-hat and two longer open hi-hats.
Read More -
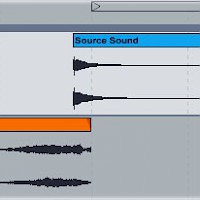
Tips for Using Reverb
A reverb effect creates a complex series of echoes from a source sound. Reverb usually simulates a certain listening environment like a jazz club or a concert hall; used heavily and creatively, it can also warp a source sound until it’s unrecognizable.
Read More -
Build a Bass Mono/Stereo Rack in Ableton
Generally speaking, the bass channel in a track should be in mono: most subwoofers (not to mention club soundsystems) play a mono signal much better than a stereo one.
Read More -
Make a Moombahton Beat
Programming a moombahton drum pattern in Ableton Live is somewhat similar to making a house beat — but with some significant differences. To create its swinging, funky vibe, moombahton uses more syncopated and off-beat percussion than house usually does.
Read More -
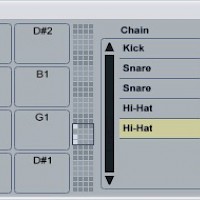
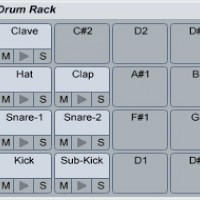
Doubling Drums
Using two copies of the same drum sample in a beat makes the drums sound bigger and fuller. Load up a kick, snare and hi-hat into Ableton’s Drum Rack, then open the Rack’s “Chains” section. Right-click the snare drum in the list of chains and select “Duplicate.” Do the same for the hi-hat.
Read More