Mixing the Bass and Kick
Because the bassline and the kick drum are the two lowest-frequency elements of your track, they’ll often end up occupying the same space in the frequency spectrum. When they overlap, they can cancel each other out, causing your track to lose some of its low-end impact. Use a few tricks to keep the bass and the kick separate:
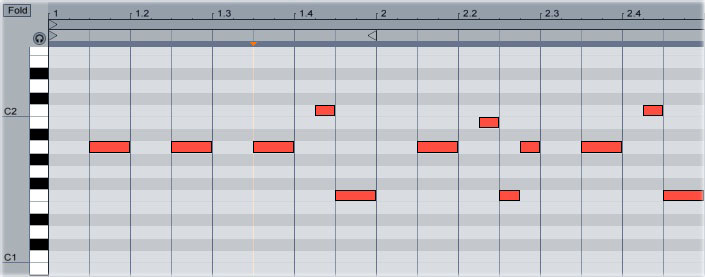
Timing
The easiest way to make sure that the kick and the bass don’t conflict is to just play them at different times. If you’re making a house track, for example, play the bassline so that the notes don’t fall on beats 1, 1.2, 1.3 and 1.4:
EQ
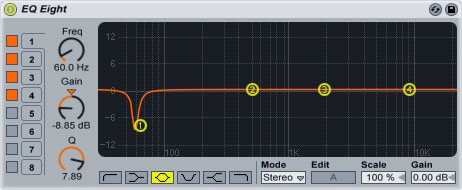
Use an EQ plugin to remove the frequencies that the kick uses from the bassline. Most kick drums are at around 60 Hz; if you’re not sure about the sample you’re using, use a spectrum analysis plugin (like Ableton’s built-in Spectrum) to see what frequencies the kick peaks at. Use the EQ to create a narrow notch that cuts these frequencies from the bassline:
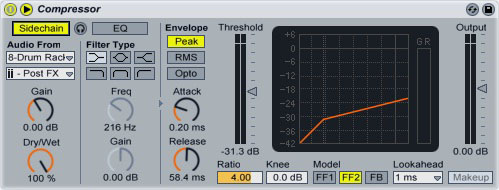
Sidechain Compression
Sidechaining the bass to the kick tells the bassline’s volume to go lower whenever the kick plays, then go back up when the kick stops. Add the Ableton compressor to the bassline, then open the sidechain section. Select “Drum Rack” in the “Audio From” section, then select the kick drum from the second “Audio From” menu.
Set the “Threshold” control to about -30 dB, then set the “Ratio” control to around 4. Set a medium-fast attack and a medium release, then start playing the track. Adjust the threshold and release controls as needed, depending on how noticeable you want the sidechaining to be (higher ratio and lower threshold settings will make the bassline “pump” more).