Adding Movement to Pads
Pads are simple, drawn-out synths that sit in the background of a track. Because they’re background instruments, pads are usually fairly uncomplicated, so as not to distract from the rest of the track. Uncomplicated doesn’t have to mean static, though. Add more life and movement to your pads by modulating their filter settings, panorama, volume and pitch to create evolving, kinetic sounds.
Let’s start with a basic pad-type sound: two saw waves, slightly detuned, with long attack and release envelope settings. I’m using the free Synth1 VST plug-in (downloadable here), but you can do the same thing with any synth. Turn on the synth’s low-pass filter and set its cutoff about three-quarters of the way up.
Turn the filter’s envelope amount knob all the way up. Set the filter envelope’s attack to about 3/4 of the way up, then turn the decay knob to a bit less than that. Turn the sustain knob to 3/4 as well, then set the release knob to about halfway up. These settings tell the filter to slowly open up over the course of the long, drawn-out pad notes:

Turn on the synth’s first LFO and set it to a random smoothed waveform. If your synth doesn’t have this shape in its LFO section, use a sine wave instead. Set the LFO to modify the pan setting. Turn the LFO’s speed (or rate) and amount (or depth) controls almost all the way down: you’re looking for a subtle effect here. The sound will smoothly but randomly shift from the left to the right channel and back:
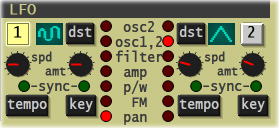
Turn on the second LFO, then set its waveform to a sine wave. Route it to the synth’s amplification control. Turn on the LFO’s sync control, then set its rate to a 1/2 note. Turn up the LFO’s amount knob: as the pad plays, the volume will pulsate in time with the beat.
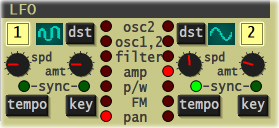
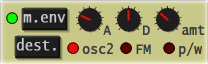
Synchronize the volume to the tempo. The final way that we can add movement to the pad is by modulating the sound’s pitch. We could route an LFO to the oscillators’ pitch controls to create a vibrato effect — but we’re already using both LFOs. Instead, let’s use a mod envelope to add a rising pitch to the beginning of the sound.
Turn on the mod envelope (“M.Env” in Synth1) and select “Osc2″ as the destination. Turn the attack knob about a third of the way up; set the decay knob at the halfway point. Turn the amount knob to just under halfway up:
Now that you have the basic pad sound down, add even more movement and ambiance by routing the synth to reverb, chorus and/or flanger effects.