3-D Mixing
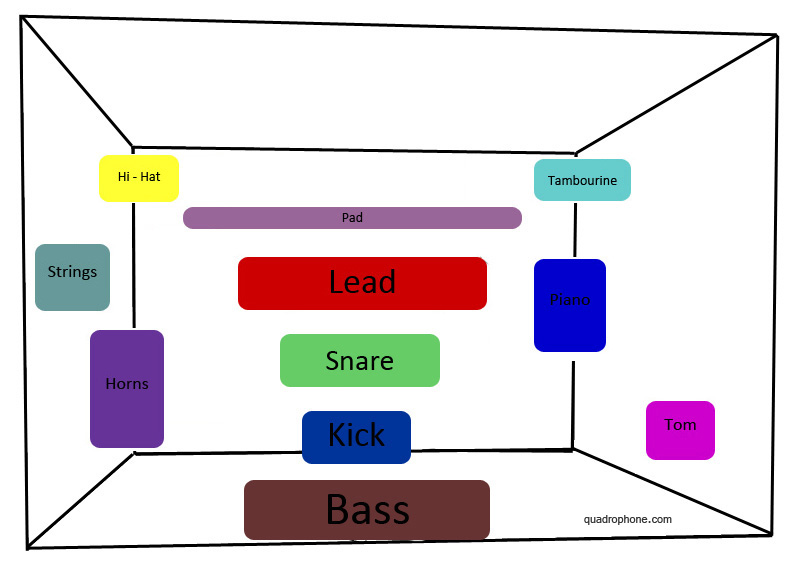
To prevent sonic conflict, each element in your track needs its own space in the mix. To help you put each element in its own space, think of the mix as if it were filling a room, with the listener standing against a wall, facing the centre of the room. You can move an element up and down in the room by changing its frequency, send it forward and backward by using volume and reverb, and shift it left and right using the pan controls. A typical mix “room” might look something like this:

The bass, kick, snare and lead synth are all front and centre. The pad synth floats up near the ceiling in the background, stretching from wall to wall. The hi-hats and tambourines are panned into the corners, farther away from the listener than the rest of the drums, and the strings and horns are on the left, a little farther away than the lead synth.
You can change the frequency of an element (i. e. move it up or down) by either changing the pitch or by EQing out the unwanted frequencies. Changing an instrument’s pitch will move it significantly up or down in the mix space; using an EQ or filter produces a more subtle change. To move the element upward, filter out the low frequencies; to move it downward, take out the high frequencies.
Changing the volume and reverb level of an element moves it forward and backward (or “closer” and “farther away”) in the mix. To move an element closer to the listener, increase its volume and/or decrease the amount of reverb on the element. The more reverb there is on a sound, the farther away the sound will seem.
Moving a sound left and right is pretty self-evident: just change its pan control. You can also use automation to change an element’s position over the course of the track; just make sure that its new position doesn’t conflict with any other elements.
Listen to these two versions of the same audio clip. In this first clip, everything is panned to the centre, is at the same volume and is un-EQed:
This clip has been processed using the 3-D mixing techniques discussed above:


