How to Make a House Beat
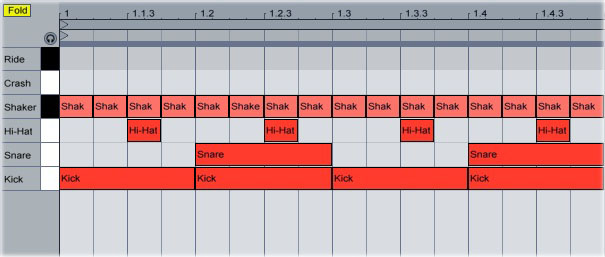
Open Drum Rack on a MIDI track, then set the global BPM to about 125. Load up a kick, snare, hi-hat, shaker, crash cymbal and ride cymbal. Turn all of the samples’ velocity controls up. Create a new MIDI clip, then put a kick on 1, 1.2, 1.3 and 1.4. Put the snare sample on 1.2 and 1.4. Program the hi-hat on 1.1.3, 1.2.3, 1.3.3 and 1.4.3. Add a shaker on every sixteenth note:
Lengthen the clip to 8 bars, then duplicate the drum pattern you created so that it fills the entire clip. Put the crash cymbal on the first beat, then put the ride cymbal on the 8th bar (click the image for an enlargement):

Now that you’ve got the basic beat programmed, make it more interesting by adding additional percussion. Load a clap sample, then load two or three additional percussion sounds (congas, toms and tambourines, for example). Replace the snares on 4.4 and 8.4 with claps, then add the other percussion sounds to the drum pattern. Experiment with different placements for the different samples, but try to give each percussion sound its own space in the loop. Keeping the different percussive sounds separated makes the drum loop much funkier and more flowing (click for enlargement):

Separate the percussion even more by using the panning controls in the Drum Rack. Panning the tom to the left, for example, and the conga to the right, will make it sound more like the drums are talking to each other.
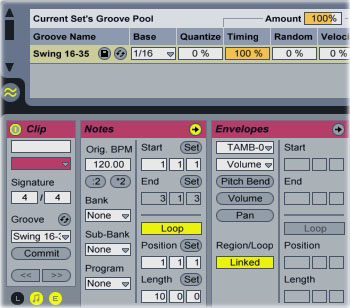
Use the swing feature to make the drum loop flow even more. Swing moves the drum sounds slightly off the beat, giving the pattern more of a live sound. In Ableton, you add swing using the Groove Pool. Open up the Groove Pool browser, then select one of the “Swing 16” options. Set the clip’s “Groove” menu to the selected swing setting, then use the “Amount” control in the Groove Pool to add more or less swing.
Finish off the beat by integrating loops and adding ghost notes.


