• Free Up Resources for Mixing

    The more VST instruments and effects you open in your DAW, the more system resources it takes up. Running multiple synths and FX — especially processor-heavy plug-ins like reverbs — can introduce artifacts into playback and slow down the interface, which is especially annoying when you’re mixing a song. Here’s a trick to save some CPU and memory by bouncing MIDI tracks to audio:

    • Back up your track. Once you bounce the MIDI tracks, you won’t be able to change any of the notes or other MIDI data.
    • Remove any effects from the MIDI channels in the track. Each MIDI track should only have the synth on it. If you want to keep the effects’ parameter settings, move the plug-ins to an empty track instead of deleting them.
    • Bounce all of the MIDI tracks to audio. In Ableton, right-click a track and select “Freeze,” then right-click it again and select “Flatten.” Your DAW will convert the MIDI track to an audio waveform, which requires much less processing power.
    • Re-add the effects to their former tracks. Your CPU now only needs to deal with the FX, not the synths and effects together.

    If one of your synths is especially processor-intensive (Spectrasonics Omnisphere, for example), try bouncing that track to audio first — you might not need to convert the rest of the tracks.

  • Supatrigga

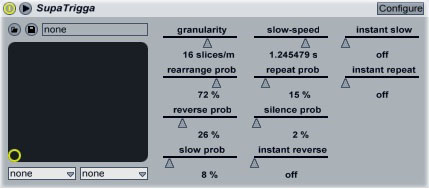
    SupaTrigga’s one of my favourite little free VST effects. It automatically cuts an audio input into slices and rearranges them randomly in real time. You can configure the length of the slices (8 and 16 are the most usable settings, but it can go up to 128 slices per measure). Download SupaTrigga for free from here.

    Supatrigga

    Set the “Rearrange Prob” slider first; this controls how many slices in each measure SupaTrigga alters. With all the other sliders set to zero, the plug-in will only reorder the slices; add more effects by increasing the “Reverse,” “Slow,” “Repeat” and “Silence” sliders. One effective way to use SupaTrigga is to separate the drum part into two tracks: one containing only the kick and snare, and one with everything else. Put SupaTrigga on the track with everything else, then set it to rearrange the beat. This way, the backbone of the drums (i. e. the kick and snare) stays constant, while everything else goes crazy.

  • Checking Mono Compatibility

    Checking your mix’s mono compatibility is essential if you plan to play the track on a club sound system (if the mix isn’t mono-compatible, playing it through a mono system will cause phasing issues). Use the Utility plug-in in Ableton to intermittently check the mono compatibility of your track as you’re mixing.

    Drop the Utility plug-in onto the Master channel. Turn the “Width” control down to zero, then right-click the plug-in’s on/off button and select “Edit Key Map.” Ableton opens the key mapping section and highlights the Utility’s controls in orange.

    Mono Compatibility

    Press the “M” key, then press “Ctrl+K” to close the mapping section. You can now switch between mono and stereo by pressing the “M” key while you’re listening to the mix.

  • Change the Default Drum Rack in Ableton

    Found this awesome Ableton tip buried in a Sound on Sound article:

    By default, each drum sample that you drop into Ableton’s Drum Rack has a velocity of zero, a release of 50ms and six voices. Changing these settings every time you add a sample can get tedious to say the least. To configure Drum Rack to use your preferred settings, set them in an empty Simpler, then configure the Simpler as the default for the Drum Rack.

    Load up an empty Simpler onto a new track. Turn up the “Vel” control; I usually set it to 80%, but you can go all the way up to 100% if you want more velocity sensitivity. Turn the “Release” knob all the way up; this means that every time you trigger the sample, it will play all the way to the end — no matter what length the triggering note is. Set any other parameters that you always use in Drum Rack (SoS suggests also turning “Voices” down to 1).

    Ableton Drum Rack

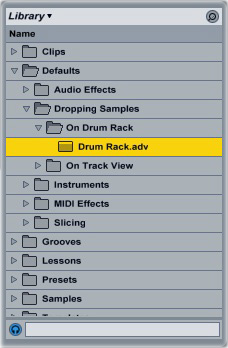
    Open the Library in Ableton’s file browser, then expand the Defaults folder. Open the Dropping Samples folder, then expand “On Drum Rack.” Drag and drop the Simpler that you configured into this folder. Rename the Simpler to “Drum Rack” (click “OK” if Ableton ask you if you want to replace the default preset).

    Ableton Drum Rack

    Now, when you drop a sample into Drum Rack, it will automatically have the configuration that you set up.